Issue/Question
- I want to create a survey/questionnaire/ Microsoft form.
- I want to edit an existing Microsoft form.
- I want to collaborate/share a Microsoft form with others.
Environment
- Microsoft Forms (Office 365)
User Role
- Students, Faculty, Staff, Help Desk Agent, Administrator
Resolution
Creating a Form
- Navigate to login.usa.edu and sign in. Click on the Office 365 Portal to open your Office 365 dashboard. Then, on the left side, click on the Forms app to open Microsoft Forms.
Note: If your Forms app is not visible on the left, click the Apps button and click the "All apps" link to find the Forms app. - To create a form, click "New Form" to start. From here, you can edit the title of your form or click +Add new to insert the type of response you would like to collect from the survey taker.
Form Response/Question Categories

- Below, I listed examples of each option to determine the type of response you want to collect.
-
Choice:
This option allows you to create a multiple-choice question.
-
Text:
This option allows you to take text input from the user as a response to your question. -
Rating:
This option allows you to collect a rating response from the user for your question. -
Date:
This option allows you to collect a date response from the user for your question.
-
Additional Form Response Categories

-
-
Ranking:
This option allows you to collect a ranking response from the user by having them rearrange the order of their options. Example: "Most favorite to least favorite food/exercise/etc." -
Likert:
This option allows you to gauge attitudes and opinions about a topic. Example: "How likely are you to... etc." -
Upload File:
This option allows you to collect a file from the user in response to your question or request. -
Net Promoter Score:
This option allows you to collect a customer experience response from the user. -
Section:
This option allows you to create/add a new section to your survey/questionnaire. These are used to separate a different collection of questions the user can/needs to answer. These can be used with Branching to determine which questions a user should answer based on their responses.
-
Editing Sections
- Go to a section and click the three dots to expand the section menu.
-
Duplicate Section:
This option duplicates the current Section if you would like to re-use some or all of the questions you created in that Section. -
Remove Section:
This will give you two options: Just Section or Section and Questions.
Just Section will remove the Section but keep the questions created and merge them into the next available Section. This is useful if you want to merge sections into one Section.
Section and Questions will remove both the Section and the questions created in that Section. This is useful if you no longer need to re-use the questions and want to remove the Section entirely from the form. -
Add Branching:
You can add branching logic to a survey or a quiz so that it changes according to the responses to specific questions. Responders only see questions that are relevant to them. If the questions don't apply, the responder will be redirected to a different set of questions or skip a set of questions altogether. For more information on branching, click here.
-
Adding Branching Logic to Your Form
Before you start, it's a good idea to ensure all your questions are created. When you're ready to add branching, follow these steps:
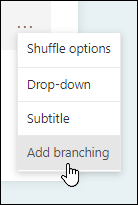
- Go to the question for which you want to add branching. Select the More settings
 button, then choose Add branching.
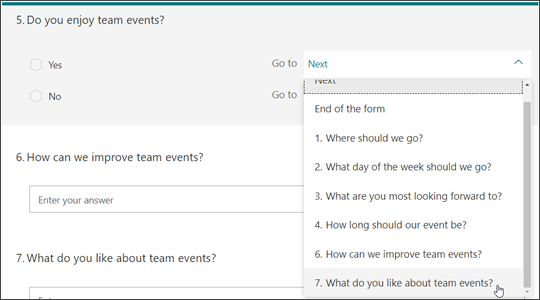
- On the Branching options page, select the drop-down list next to the question you want to branch.

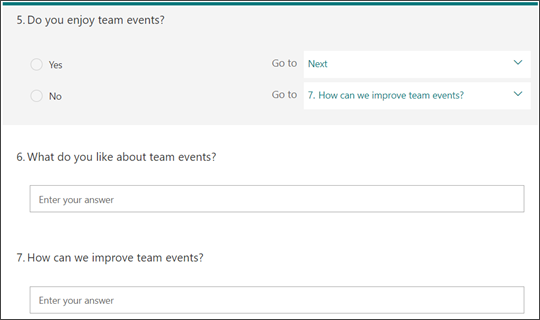
- Select the question that you want to branch to. In this example, if a respondent answers Yes to question #5, you would direct them to the next question (#6). However, if the respondent answers No to question #5, you would have them branch, or skip, to question #7.

Notes: You can only branch to a consecutive question, not a preceding one. For example, if you have seven questions in your form and want to add branching to question 4, it can only branch to questions 5, 6, 7, or the End of the form. In the same example, question 5 can only branch to questions 6, 7, or End of the form.
If you try to branch to a preceding question, such as question 4 branching to question 2, it will break the experience for your respondent by skipping questions 5 through 7 and taking them directly to the End of the form with the Submit button. To prevent this, only branch to a consecutive question.
- You can repeat steps 2 and 3 to add more branches to your survey or quiz. If you want a particular question assigned as the final one in the survey or quiz, select the drop-down list next to that question, and then choose End of the form.
- If you want to reset your form and remove branching completely, select the More options
 button and then choose Reset.
Sharing
- To share your form with others and start collecting responses, click the Share to Collect Responses button under the Responses tab on your form. This will allow you to choose who can respond to your form.
- Selecting "Only people in the Unversity of St Augustine can respond" will only allow users with an @usa.edu email address to respond to the form. They must also be signed into their @usa.edu Microsoft account; personal Microsoft accounts will result in an error, and they will be denied access.
- Selecting "Specific people in the University of St Augustine can respond" will allow you to specify which people with an @usa.edu email address can respond to the form. For example, you only want people in your group, course, organization, or department to respond to the form.
- Selecting "Anyone can respond" will allow anyone outside the organization to access the form and provide a response. You can use this at your discretion, as the results may create outliers based on individual response behaviors. It would be best to share the link only with people from whom you intend to collect responses. Pasting the link publicly may result in unintended feedback from more people than intended.
Note: If you added the Upload File option to your form, please note that the "Anyone can respond" option will be unavailable for security reasons.
Editing and Collaboration
- The Form owner can edit any questions and sections by default. If you would like to collaborate on a form or allow someone else to edit the questions and view responses, click on the three dots at the top-right of the form. Then, click on Collaborate or Duplicate.
Adding Collaborators
- You can click "Share the link to collaborate and view result" to get a shareable link you can share with anyone you want to collaborate on the form with. This means they can edit/view/rearrange the questions/responses.
Sharing your form as a Template
- You can click "Get a link to duplicate" if you would like to share your form as a template for others so they can make it their own. Only questions and sections will be copied. Responses are not included.
Additional Form Response Settings
- Additional options are available under Settings if you would like users to receive a receipt for their responses after submission.
- Once satisfied with your survey/questionnaire, you may use the Preview option near the top-right of the page to view how the form will look for your Computer and Mobile users.
If you need additional help or clarification, don't hesitate to contact IT Support at https://usa7417.zendesk.com/hc/en-us/articles/360050371394-Ways-to-get-IT-help-.
Comments
Please sign in to leave a comment.